Introduction
I want to build a small, low-cost, (low-power?) autonomous vehicle that "punches above its weight class" in terms of functionality and is grown from the ground up in a Rust ecosystem. The ingredients for this kind of project have been around for a while, and I the last time I tried to do this I got stuck in a few places I'm ready to get past this time.
The previous project suffered from a lack of discipline, way too much complexity, and honest-to-god fear of tools and libraries in Rust.
Here's what I'm thinking...
Rust everywhere
I want to use Rust for the software and firmware. Embedded Rust is an interesting area and evolving quickly. I want to learn it. I really enjoy working in Rust and the Cargo toolchain is incredible.
The embedded Rust ecosystem is growing quickly, and I think it's a good idea to use it. The higher level software (like what would run on a Raspberry Pi) can be written in Rust, and more institutions are starting to use Rust for their code so it's a good skill to have.
Other systems like Bevy and remote protocol or networking tools in Rust are growing quickly as well and I think they are suited perfectly for the kinds of needs I will have with this project. Using a game engine like Bevy for modeling and simulation is somewhat novel but I think it's a good fit since it is also Rust native and is fully featured.
Everything in the loop
I want to develop the software and firmware with tests that can be run directly on the hardware with everything in the loop. I want to be able to test the software with "fake" inputs and outputs that react as I expect them to in real life. The goal is to have everything working on my desk and then have everything run exactly the same way when it's time for flight.
See: Emulation
Use what's in my drawer
We don't need to buy anything new or use anything custom. It would be nice, sure, but that's one of the things that killed the last project.
Here's a list of what I found in my drawer (it's more than enough to get started!):
- tiny gps breakout https://www.sparkfun.com/products/retired/10995
- rpi 4b
- rpi zero w 1.1
- msp432
- stm32F411e
- arduino mkr fpga https://www.arduino.cc/en/Guide/MKRVidor4000
- a TTL camera
We're missing power systems and radios, but I think there's plenty here to get the fundamentals working and add those later. The systems can operate on the bench with "shore power" and a data umbilical. Later on, both of those can be replaced with battery and radio modules that are drop-in replacements. By making this assumption, we pretty much guarantee that we'll understand the power requirements and communication protocols with a high degree of confidence. Then later, we part out those systems accordingly. Since we're not constrained by power or comms in terms of the design, this is totally acceptable.
System Sketch
In the Introduction I mentioned that Rust allows us to theoretically write everything in Rust. This is a sketch of how I think the system will look in practice.
System boundaries
Here are the main categories of systems I see:
- Sensor - interprets information about the world and convert it into data.
- State - represents the configuration of a system (and persists it!).
- Physical state governs interactions with the physical world.
- Logical state governs interactions within software.
- Operator - moves, mutates, and/or queries state or sensor data.
- Actuator - changes a physical state.
- Transport - moves data between systems.
- Agent - a system that combines sensors, state, operators, and actuators. Agents send and receive messages (or commands) to or from other agents.
- User Interface - a system that allows a human to observe or change data.
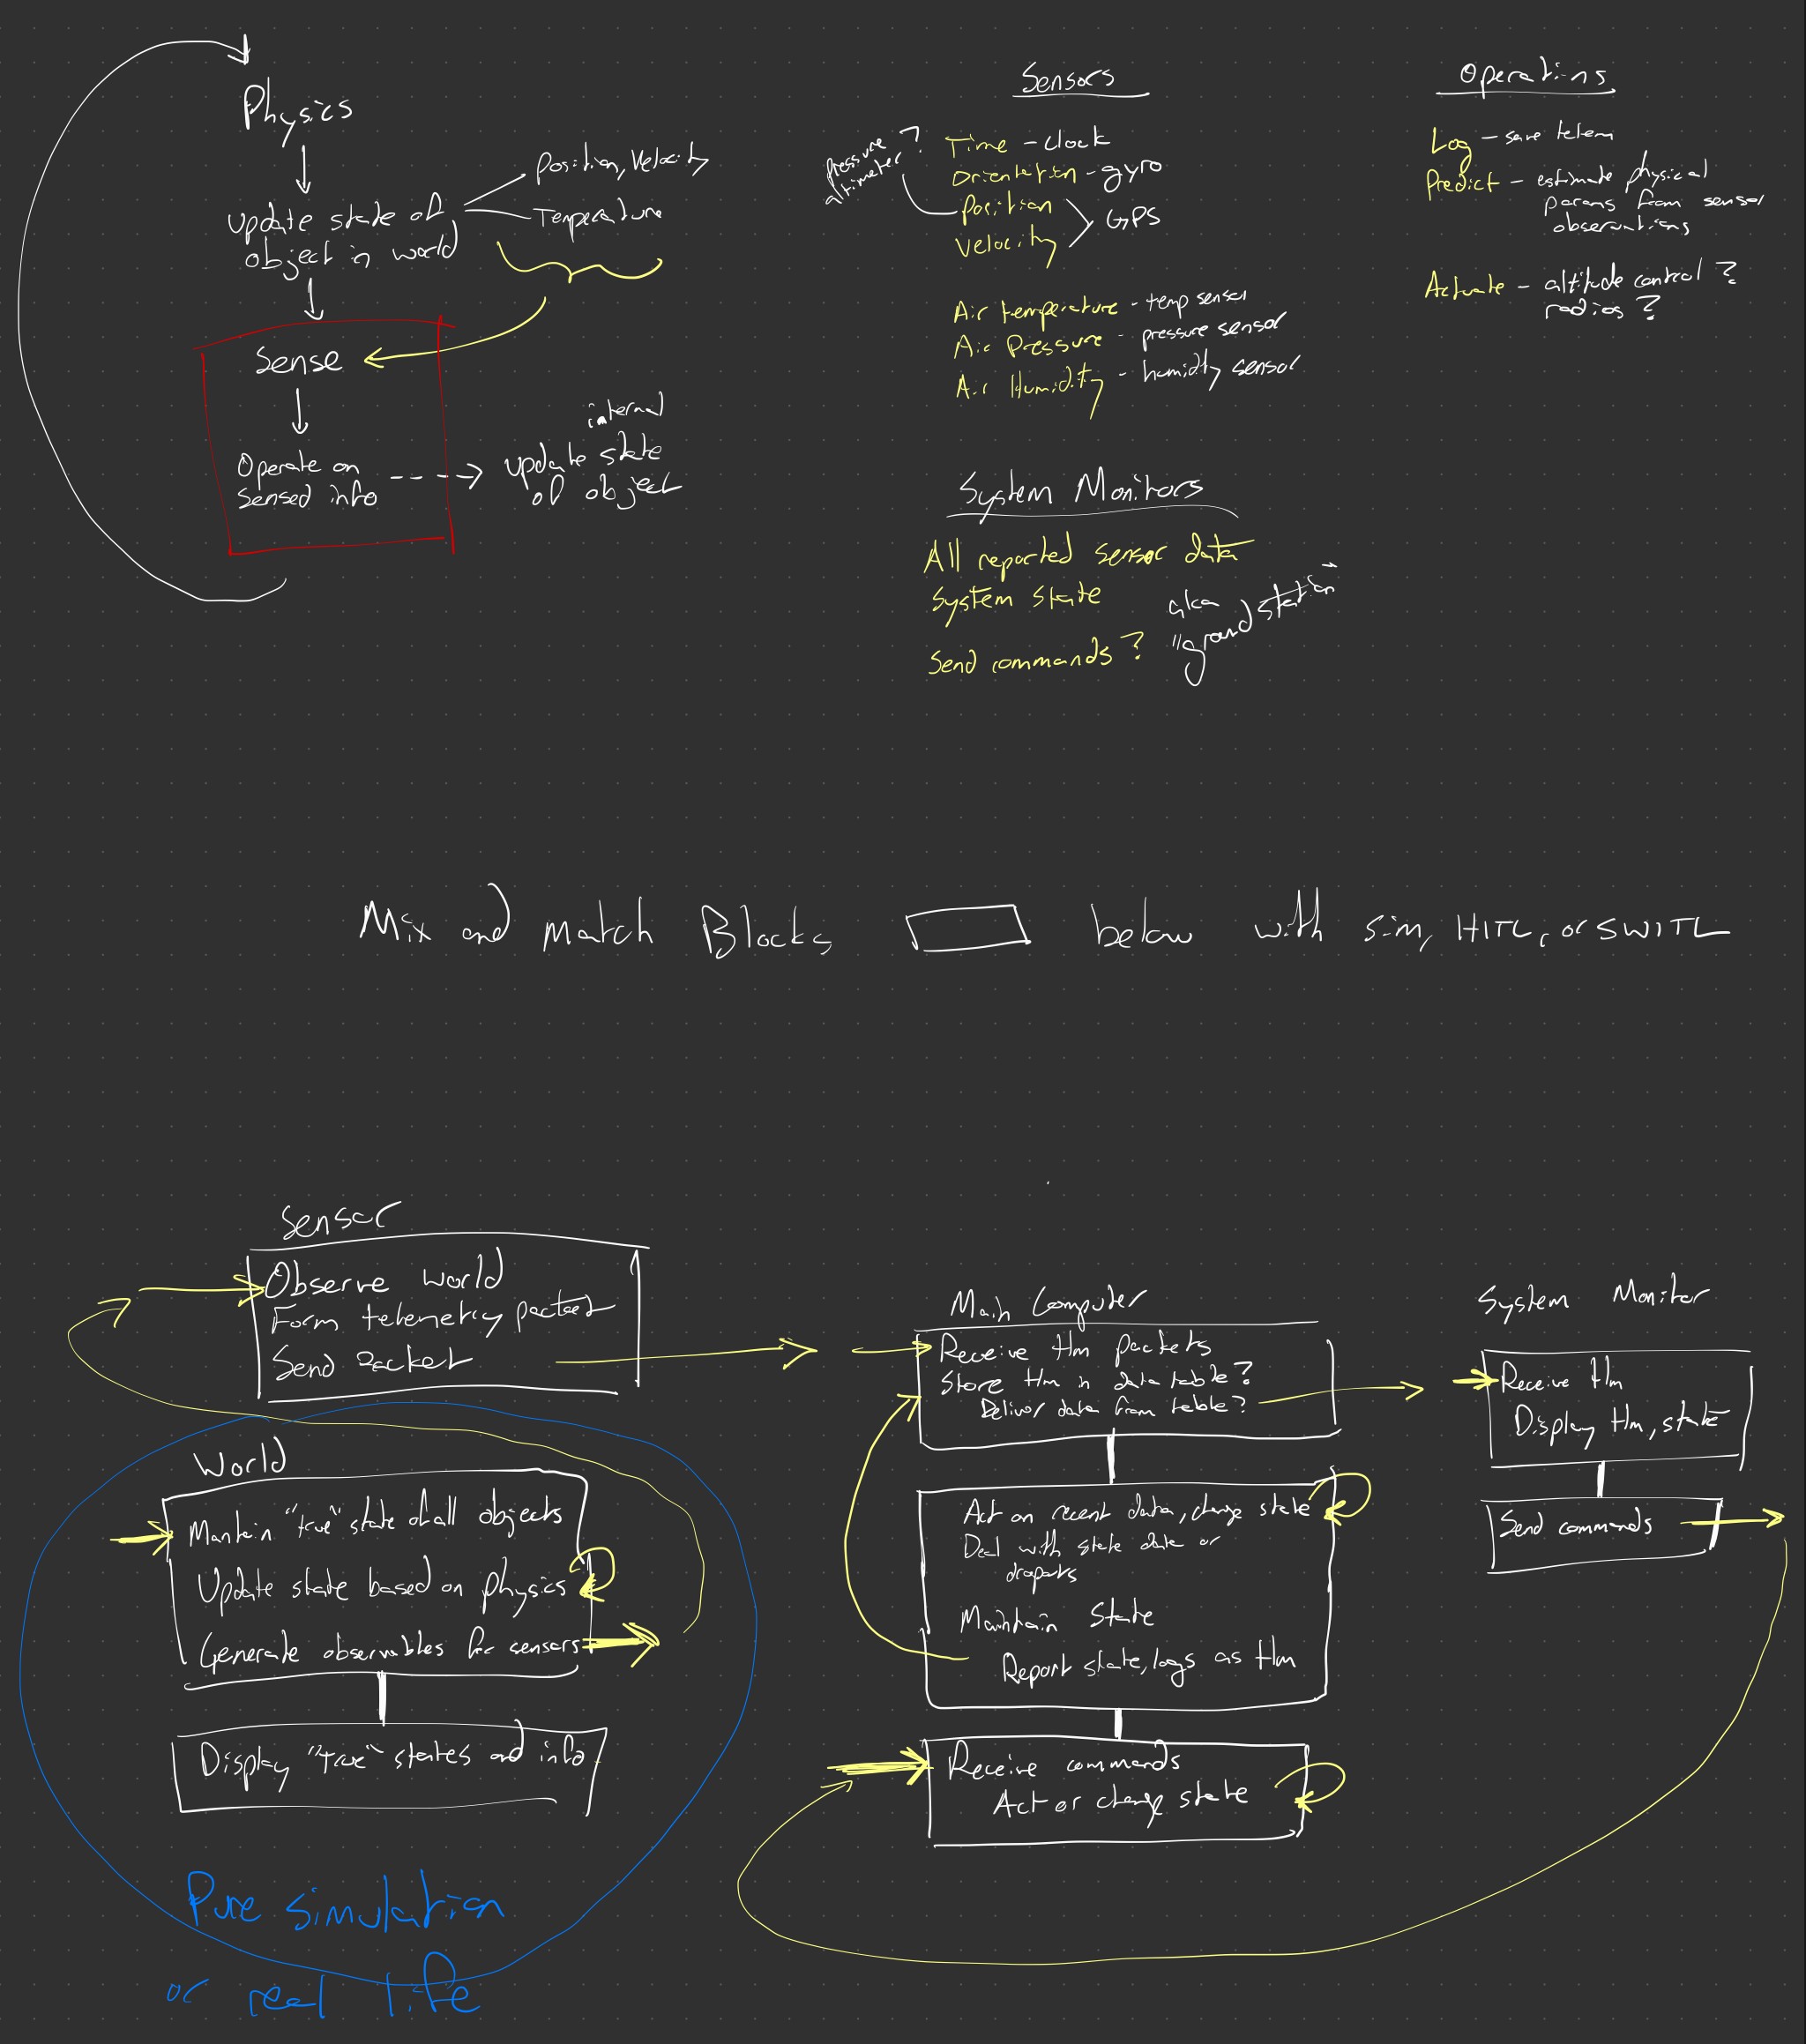
Let's see if we can break down those systems into "blocks" of systems.
- The World - Updating the "world state" of physical objects is pretty much a self-contained system. There are known physics rules and the state of those objects continues to evolve by those rules without any external input from an agent.
- Sensors - Physically, sensors are self-contained systems. They observe data about the world and convert it into some format, then ship it elsewhere. The source of the observation and the destination of the data can be abstracted or simulated or whatever. Sensors are often simple hardware systems. I think we can exclude microcontrollers from this category.
- Computers - Regardless of whether a computer is a microcontroller or runs an operating system or whatever, in this case I mean it as a system that takes in data, does something with it, and then outputs data. At the most basic level this would be a logger. More complicated systems could be an altitude controller. These systems are often much larger than sensors, but can still be contained relatively cleanly (and often along hardware boundaries).
- User Interfaces - CLIs or UIs that allow a human to observe or interact with a system are also nearly-completely self-contained systems and independent from all of the other systems at play.
Each of these "blocks" represents a system boundary that can be swapped in or out with a simulation, abstraction, or an actual physical system. (The obvious exception here is the "world" block, but hopefully it is equally obvious how to swap that out with a simulation or real system... you fly it!)
| Block | Examples | Flavor of Rust | Project |
|---|---|---|---|
| Sensors | IMU, GPS, etc. | Embedded Rust (no-std) | ahab |
| Computers | Logger, altitude controller, etc. | Regular Rust (std) or embedded Rust (no-std) | ahab |
| The World | Physics engine, weather simulation, etc. | Bevy (game engine) and/or regular Rust (std) | yahs |
| User Interfaces | CLI, web app, etc. | Bevy (game engine), Egui, and/or regular Rust (std) | yahs |
To simplify things (ha!) we can offload the "world" and UI blocks to other projects like yahs. Codevelopment is good but spaghetti interdependencies are bad.
Data interfaces
The data interfaces are the most important part of the system. They are the glue that holds everything together. Unfortunately, they are also the things that have to be flexible enough to support a simulation, abstraction, or real-world system.
I think we can get over this hump by using data interface patterns that lean on software patterns that can be modeled or abstracted in a simulation environment. So things like message queues, async/await, ethernet and other network protocols, and databases can be modeled in a simulation environment and still be implemented in the hardware in pretty much the same way. That's the claim, anyway.
Main Computer (MC)
The computer or system on chip that orchestrates all actions. Captain of the ship. Maestro of the choir. Usually the MC does the work of deciding when to command other systems and tell them what to do, decide what to do, and file system management.
An entire OS isn't really necessary here, but with a Raspberry Pi Zero and Raspberry Pi 4B+ on hand there's not really an advantage to running a system without one. The processors are fast enough to easily have headroom after dealing with OS level processes, and having an OS opens up the kinds of software that can run onboard.
Device Interface Module (DIM)
A Device Interface Emulator (DIM) sits in between the host vehicle's [[Main Computer (MC)|Main Computer (MC)]] and any device, such as a sensor or actuator. The DIM is the MFC's "gateway" to the low-level device. The DIM transforms device activities into data that can be interpreted by the MFC. In this way, DIMs abstract device specifics from the main flight software.
Sensors to use
[!NOTE] Some info may not apply Some of the sensors and use cases here might not apply to vehicles that are not airborne.
Observables
Here is a (non-exhaustive) list of sensors and the observables they can could provide.
| Sensor | Observables |
|---|---|
| Clock | Time |
| GPS | Position, velocity |
| IMU | Orientation, Velocity, Angular velocity, Acceleration, Angular acceleration |
| Barometer | Air pressure |
| Barometric Altitmeter | Air pressure, altitude |
| Thermometer | Air temperature |
| Hygrometer | Air humidity |
And maybe some other telemetry that would be derived from the above sensors.
| Source | Observable |
|---|---|
| Air temperature, humidity, pressure | Air density |
| Ballistic trajectory vs observed velocity and position | Wind speed, wind direction |
| Dead reckoning from accelerations | Position, velocity |
Parts
- RFM96W LoRa Transceiver (915 MHz). This also comes in a 433 MHz version, but as far as I can tell it's a region lock thing---The Americas use 915 Mhz for the license-free ISM band. The 915 MHz version has an operating power of up to 100 mW and 300 kbps, which should be enough for me.
- NEO-M9N GPS. According to the datasheet it should work up to 80 km. This is the newest version of this chip but I think modules as old as NEO-M6 would work.
- BME280 Atmospheric Sensor. The myth, the legend, the classic pressure, humidity, and temperature sensor.
Some other parts that are overkill but would be nice to have:
- Qwiic MicroPressure Sensor. This is a barometer that has a calibrated sensing range of 60mbar to 2.5bar. I think it would be useful to have a sensitive barometer for higher altitudes where a more general purpose barometer might not be sensitive enough.
- OpenLog Artemis. This is a data logger board with a built-in IMU, voltage loggers, some high-rate sampling for a few channels or ~250Hz logging in general. It automatically detects, configures, and logs Qwiic boards, including all the sensors I'd want to use for this project.
Emulation
Sensor emulation is useful for hardware- and software-in-the-loop testing because it enables total control of the observable environment from the vehicle's perspective.
An emulator is a device, usually a microcontroller, that produces synthetic data that is indistinguishable from the flight device. The emulator accepts signals (digital, analog, or command messages) from the host and emits signals or data that mimic the actual device.
Instead of sensing the actual environment or actuating a device, the emulator simulates a flight environment or any other fictional situation dictated by a separate host (not the vehicle) and produces signals that mimic what the emulated device would make in the corresponding situation.
Emulation is coordinated by a separate host running a simulated environment that tells the emulator what to do. The simulated environment should also respond to actuator signals accordingly.
DIM Emulator
A [[Device Interface Module (DIM)|Device Interface Emulator (DIM)]] sits in between the host vehicle's [[Main Computer (MC)|Main Flight Computer (MFC)]] and any device, such as a sensor or actuator. The DIM is the MFC's "gateway" to the low-level device. An emulator can pose as the real DIM as long as the interface to the MFC remains the same.
A DIM Emulator shares the same interface to the MFC as a normal DIM, but that's the only hardware requirement. The emulator uses whatever controller and software we want, as long as the signals over the MFC interface look right.
graph TD
	MFC["Main Flight Computer"]

    subgraph DIM["Device Interface Module"]
        HDIM["Real DIM"]
        Emulator["DIM Emulator"]
    end

	Device["Sensor / Actuator"]


    MFC -- "Ethernet / CAN" --> DIM
    HDIM -- "UART" --> Device
    Emulator --> Simulator

    style DIM fill:#90ee90,stroke:#006400,stroke-width:2px
    style Emulator fill:#add8e6,stroke:#00008b,stroke-width:2px
    linkStyle 2 stroke-dasharray: 5 5
This page will talk about how the environment is simulated and fed to Emulation.
See also: https://github.com/philiplinden/yahs
Getting started with the STM32F411VE
Here are some notes on how to set up a development environment to work on this project. YMMV.
I recommend following this video tutorial to get started.
We'll use the STM32F411VE as our target system.
Setting up your development environment
- Install Rust 1.31 or newer.
- Add cortex-m targets to your toolchain. We are using Cortex-M4F, so:
rustup target add thumbv7em-none-eabihf - Read the Embedded Rust Book in its entirety. Just kidding, but it's a good idea to bookmark it.
- If you're using VSCode or one of its derivatives, install the rust-analyzer extension and the Cortex-Debug extension. There are some more details here for advanced configurations.
Setting up the project
Configuring the compiler target
A target triple is a string that describes the target architecture, vendor, operating system, and environment.
<arch><subarch>-<vendor>-<sys>-<env>
archis the architecture, e.g.arm,x86,aarch64, etc.subarchis the subarchitecture, e.g.v7,v8,v9, etc.vendoris the vendor, e.g.none,apple,nvidia,intel, etc.sysis the operating system, e.g.none,linux,windows,macos, etc.envis the environment, e.g.eabihf,gnu,musl, etc.
Both the MSP432 and the STM32F411E use the Cortex-M4F with a floating point unit. This chip is part of the ARMv7e-M architecture family.
The rustc docs show
that the target triple for ARMv7E-M is thumbv7em-none-eabi or
thumbv7em-none-eabihf.
- The
thumbv7emprefix indicates that our Cortex-M4F uses the Thumb-2 instruction set and the ARMv7E-M architecture. - The
nonevendor indicates that the target does not have an operating system. - The
eabioreabihfsuffix indicates the ABI to use. Since we have an FPU, we use theeabihfvariant.
Now that we know the target triple, we can add it to the cargo toolchain on our
host machine and in our .cargo/config.toml file to tell the compiler how to
build code for the project's target.
# add the target architecture to the toolchain
rustup target add thumbv7em-none-eabihf
And to make sure the correct target and flags are used every cargo build, we
can add the following to our .cargo/config.toml file so we don't have to type
it out every time.
[build]
target = "thumbv7em-none-eabihf"     # Cortex-M4F and Cortex-M7F (with FPU)

[target.thumbv7em-none-eabihf]
rustflags = ["-C", "link-arg=-Tlink.x"]
But the IDE might still complain about failing to build the project for the host architecture. We can instruct the IDE extensions to only build for the embedded target by adding some extra configs. The following is an example for VSCode.
// .vscode/settings.json
{
    "rust-analyzer.cargo.allTargets": false,
    "rust-analyzer.cargo.target": "thumbv7em-none-eabihf"
}
The cortex-m-quickstart
also includes a build.rs file that sets up the target triple and the linker
script, accounting for some of the edge cases that can happen when building to
make sure that the linker actually sees the memory.x file and stuff. Be
careful though, because the build.rs file also sets the rustflags so we have
to remove them from the .cargo/config.toml file if we use the build.rs file.
Configuring the Cortex-M crates
The embedded Rust tools make it easy to build and run programs on the target but require a little extra setup to get running for our specific target.
The first crate to set up is the runtime crate, cortex-m-rt. This crate
provides the entry! macro, which is used to mark the entry point of the
program, and interrupt handling.
// src/main.rs
#![no_std]
#![no_main]

use cortex_m_rt::entry;

#[entry]
fn main() -> ! {
    loop {
        // your code goes here
    }
}
The cortex-m-rt crate expects
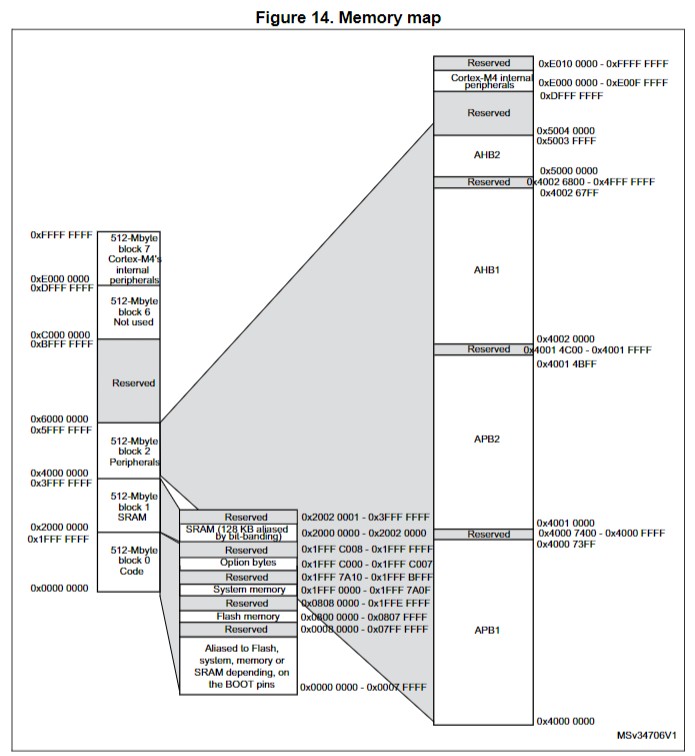
a memory.x file that specifies the flash and RAM memory layouts of the target.
According to the datasheet, the flash memory is at 0x0800 0000 - 0x0807 FFFF
and the RAM is at 0x2000 0000 - 0x2002 0000.
Another thing that is required by the cortex-m-rt runtime is a panic handler.
A panic handler accepts a PanicInfo argument and never returns. This code will
run when the program (our code or a dependency) panics. It is required!
#![allow(unused)]
#![no_std]

fn main() {
#[panic_handler]
fn panic(_info: &PanicInfo) -> ! {
    // do something
}
}
There are more advanced ways to handle panics, including a number of third-party
crates, but for now we'll just set up a basic one: panic-halt. This crate
makes an infinite loop happen when a panic occurs, which can be helpful when
debugging. We should replace it later. Now we're not actually using the
crate's functions, but we need to declare it so the compiler knows it exists.
// src/main.rs
#![no_std]
#![no_main]

use cortex_m_rt::entry;
use panic_halt as _;

#[entry]
fn main() -> ! {
    loop {
        // your code goes here
    }
}
Flashing the device
There are a few more toolchains to install for ergonomics. llvm-tools enables
some low-level debugging and inspection features, and cargo-binutils is a more
ergonomic wrapper around llvm-tools.
rustup component add llvm-tools
cargo install cargo-binutils
Here's an example of how to use cargo-binutils to inspect the binary.
❯ cargo size -- -Ax
    Finished `dev` profile [unoptimized + debuginfo] target(s) in 0.02s
ahab_stm32f11ve  :
section                size         addr
.vector_table         0x400    0x8000000
.text                  0x70    0x8000400
.rodata                   0    0x8000470
.data                     0   0x20000000
.gnu.sgstubs              0    0x8000480
.bss                      0   0x20000000
.uninit                   0   0x20000000
.debug_abbrev        0x145d          0x0
.debug_info         0x23eef          0x0
.debug_aranges       0x1338          0x0
.debug_ranges       0x1b720          0x0
.debug_str          0x3d91c          0x0
.comment               0x99          0x0
.ARM.attributes        0x3a          0x0
.debug_frame         0x4218          0x0
.debug_line         0x2184d          0x0
.debug_loc             0x29          0x0
Total               0xa5691
One last tool is needed to flash the device. probe-rs is a tool that allows
you to interact with embedded devices, including flashing. Installation can vary
by OS, see probe-rs docs
for details. If you're on Windows, you might need to install
some drivers.
Let's see if probe-rs supports the STM32F411VE.
❯ probe-rs chip info stm32f411ve
stm32f411ve
Cores (1):
    - main (Armv7em)
NVM: 0x08000000..0x08080000 (512.0 kiB)
RAM: 0x20000000..0x20020000 (128.0 kiB)
NVM: 0x1fffc000..0x1fffc004 (4 B)
NVM: 0x1fff7800..0x1fff7a10 (528 B)
Yep! Now we want to use cargo embed to flash the device. cargo-embed is the
big brother of cargo-flash. It can also flash a target just like
cargo-flash, but it can also open an RTT terminal as well as a GDB server.
❯ cargo embed --chip stm32f411ve
    Finished `dev` profile [unoptimized + debuginfo] target(s) in 0.03s
      Config default
      Target E:\repos\philiplinden\ahab\target\thumbv7em-none-eabihf\debug\ahab_stm32f11ve
      Erasing ✔ 100% [####################]  16.00 KiB @  40.12 KiB/s (took 0s)
  Programming ✔ 100% [####################]   2.00 KiB @   4.08 KiB/s (took 0s)
     Finished in 0.49s
        Done processing config default
We can cache the chip info so we don't have to type it out every time using an
Embed.toml file that cargo embed will look for in the project root.
# Embed.toml
chip = "stm32f411ve"
Now we can run cargo embed and it will pull the arguments from the config.
❯ cargo embed
    Finished `dev` profile [unoptimized + debuginfo] target(s) in 0.02s
      Config default
      Target E:\repos\philiplinden\ahab\target\thumbv7em-none-eabihf\debug\ahab_stm32f11ve
      Erasing ✔ 100% [####################]  16.00 KiB @  40.25 KiB/s (took 0s)
  Programming ✔ 100% [####################]   2.00 KiB @   4.15 KiB/s (took 0s)
     Finished in 0.48s
        Done processing config default
😎
Debugging the STM32F11VE
Based on this tutorial.
With RTT
To debug the device, we can use "real time transfer", RTT. RTT is a debugging protocol that allows you to send and receive data to the device from a host computer over the debug interface.
Of course, there's a crate for this:
rtt-target.
It requires a "critical section" feature, but we can get that from
cortex-m. Then enable the RTT feature in
the Embed.toml file.
[default.rtt]
enabled = true
With GDB (maybe not supported on Windows)
GDB is a bit more complex to set up than RTT, but it's more powerful.
The GDB toolchain is available on Windows, Linux, and macOS but the installation depends on the operating system. https://developer.arm.com/downloads/-/arm-gnu-toolchain-downloads
Then set up the GDB configs in Embed.toml. Don't forget to disable RTT if
you're using GDB.
[default.rtt]
enabled = false

[default.gdb]
enabled = true

[default.reset]
# Wait for the debugger to connect before resetting the device
halt_afterwards = true
Flash the device with cargo embed as usual. After it flashes, it halts the
device until the GDB server is connected.
❯ cargo embed
      Config default
      Target E:\repos\philiplinden\ahab\target\thumbv7em-none-eabihf\debug\ahab_stm32f11ve
      Erasing ✔ 100% [####################]  16.00 KiB @  40.06 KiB/s (took 0s)
  Programming ✔ 100% [####################]   2.00 KiB @   4.12 KiB/s (took 0s)
     Finished in 0.49s
    GDB stub listening at 127.0.0.1:1337
In a separate terminal, run the GDB server.
❯ arm-none-eabi-gdb target/thumbv7em-none-eabihf/debug/ahab_stm32f11ve
GNU gdb (Arm GNU Toolchain 14.2.Rel1 (Build arm-14.52)) 15.2.90.20241130-git
Copyright (C) 2024 Free Software Foundation, Inc.
License GPLv3+: GNU GPL version 3 or later <http://gnu.org/licenses/gpl.html>
This is free software: you are free to change and redistribute it.
There is NO WARRANTY, to the extent permitted by law.
Type "show copying" and "show warranty" for details.
This GDB was configured as "--host=x86_64-w64-mingw32 --target=arm-none-eabi".
Type "show configuration" for configuration details.
For bug reporting instructions, please see:
<https://bugs.linaro.org/>.
Find the GDB manual and other documentation resources online at:
    <http://www.gnu.org/software/gdb/documentation/>.

For help, type "help".
Type "apropos word" to search for commands related to "word"...
target/thumbv7em-none-eabihf/debug/ahab_stm32f11ve: No such file or directory.
(gdb)
And connect to the device. By default, the GDB server listens on port 1337. You
can include the local host address or just :1337 to connect to the device.
(gdb) target remote 127.0.0.1:1337
Remote debugging using 127.0.0.1:1337
warning: No executable has been specified and target does not support
determining executable automatically.  Try using the "file" command.
0x080004e8 in ?? ()
Aaaaaand it doesn't work for me. This seems like
an active issue with
probe-rs, as indicated by the log message "GDB stub listening...".
Stick to RTT for now, at least when using a Windows host.
Blinky with STM32F411VE
This page is a collection of notes on how to do a blinky program with the STM32F411VE following this tutorial.
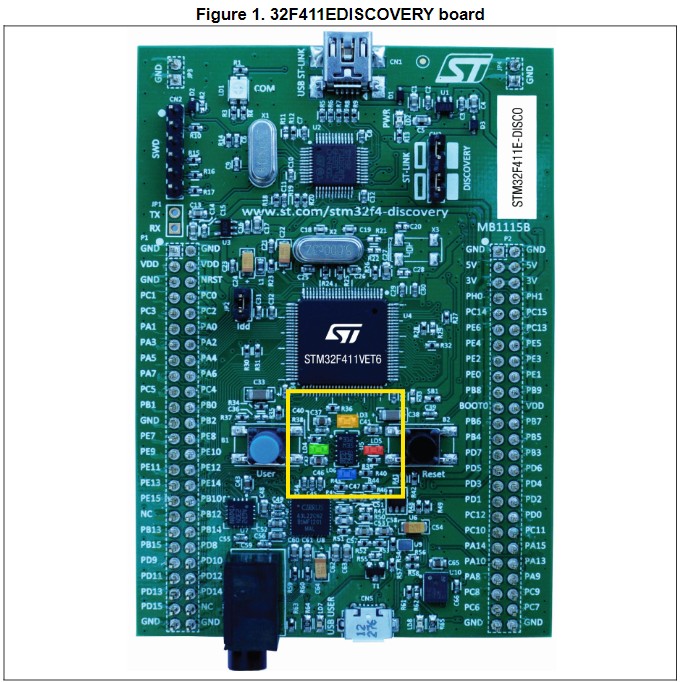
Board familiarization
The STM32F411VE has 5 user-programmable LEDs and a few other indicator LEDs.
| Name | Color | Notes |
|---|---|---|
LD1 COM | Red/Green | Indicates communications are in progress between the PC and the ST-LINK/V2 |
LD2 PWR | Red | Indicates the board is powered |
User LD3 | Orange | User-programmable at PD13. |
User LD4 | Green | User-programmable at PD12. |
User LD5 | Red | User-programmable at PD14. |
User LD6 | Blue | User-programmable at PD15. |
USB LD7 | Green | Indicates when VBUS is present on CN5 and is connected to PA9 |
USB LD8 | Red | Indicates an overcurrent from VBUS of CN5 |
Turn on the green LED, we need to set PD12 to HIGH. To manipulate this pin
we need to make reads or writes to the GPIO peripheral that drives it.
From page 32 of the datasheet:
Each of the GPIO pins can be configured by software as output (push-pull or open-drain, with or without pull-up or pull-down), as input (floating, with or without pull-up or pull-down) or as peripheral alternate function. Most of the GPIO pins are shared with digital or analog alternate functions. All GPIOs are high-current-capable and have speed selection to better manage internal noise, power consumption and electromagnetic emission.
- Configure
PD12asGPIO_Output. This pin can have alternate functions, so we have to tell it what function we want to use. - Set this pin to
HIGHorLOWto turn the LED on or off.
[!TIP]
I ran into a lot of trouble getting the system to build and flash reliably. Eventually I found that embassy needs a specific combination of features to be enabled, and
probe-rsneeds to have certain options. See captain's log 2024-12-19 for details.
#![no_std]
#![no_main]

use defmt::*;
use embassy_executor::Spawner;
use embassy_stm32::gpio::{Level, Output, Speed};
use embassy_time::Timer;
use {defmt_rtt as _, panic_probe as _};

/// The entry point of the program.
///
/// This must never return. We denote this with `-> !` and make sure it happens
/// by including an unbounded loop in the function.
///
/// Print "Hello, world!" on startup then blink the green LED.
#[embassy_executor::main]
async fn main(_spawner: Spawner) {
    let p = embassy_stm32::init(Default::default());
    info!("Hello World!");

    let mut led = Output::new(p.PD12, Level::High, Speed::Low);

    loop {
        info!("high");
        led.set_high();
        Timer::after_millis(300).await;

        info!("low");
        led.set_low();
        Timer::after_millis(300).await;
    }
}
With embassy we can use cargo run to flash and run the program with logs
printed to the terminal as if we were running a native program.
❯ cargo run
   Compiling ahab_stm32f11ve v0.1.0 (E:\repos\philiplinden\ahab\crates\ahab_stm32f11ve)
    Finished `dev` profile [unoptimized + debuginfo] target(s) in 0.60s
     Running `probe-rs run --chip STM32F411VE --connect-under-reset E:\repos\philiplinden\ahab\target\thumbv7em-none-eabihf\debug\ahab_stm32f11ve`
      Erasing ✔ 100% [####################] 128.00 KiB @  53.98 KiB/s (took 2s)
  Programming ✔ 100% [####################]  72.00 KiB @  17.11 KiB/s (took 4s)
     Finished in 4.21s
0.000000 TRACE BDCR ok: 00008200
└─ embassy_stm32::rcc::bd::{impl#2}::init @ C:\Users\linde\.cargo\registry\src\index.crates.io-1949cf8c6b5b557f\embassy-stm32-0.1.0\src\fmt.rs:117
0.000000 DEBUG flash: latency=0
└─ embassy_stm32::rcc::_version::init @ C:\Users\linde\.cargo\registry\src\index.crates.io-1949cf8c6b5b557f\embassy-stm32-0.1.0\src\fmt.rs:130
0.000823 INFO  high
└─ ahab_stm32f11ve::____embassy_main_task::{async_fn#0} @ src\main.rs:24
0.301788 INFO  low
└─ ahab_stm32f11ve::____embassy_main_task::{async_fn#0} @ src\main.rs:28
0.602813 INFO  high
└─ ahab_stm32f11ve::____embassy_main_task::{async_fn#0} @ src\main.rs:24
0.903839 INFO  low
└─ ahab_stm32f11ve::____embassy_main_task::{async_fn#0} @ src\main.rs:28