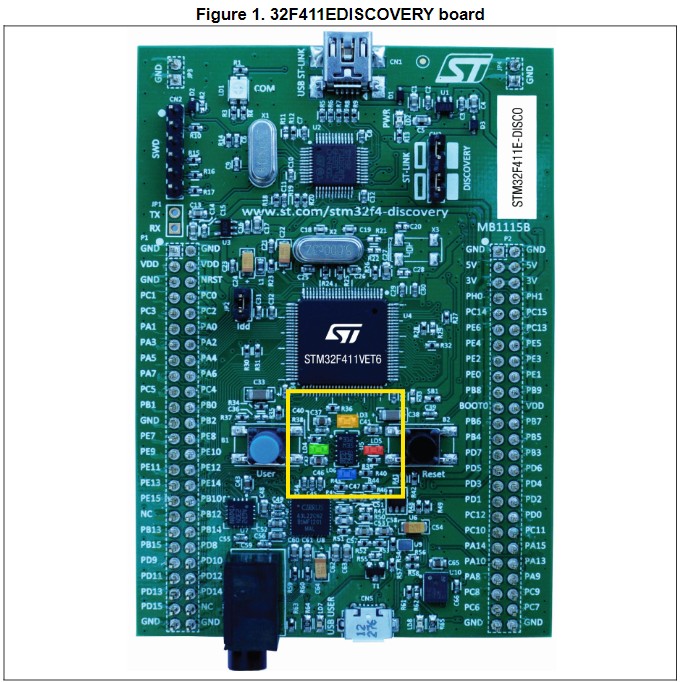
Blinky with STM32F411VE
This page is a collection of notes on how to do a blinky program with the STM32F411VE following this tutorial.
Board familiarization
The STM32F411VE has 5 user-programmable LEDs and a few other indicator LEDs.
| Name | Color | Notes |
|---|---|---|
LD1 COM | Red/Green | Indicates communications are in progress between the PC and the ST-LINK/V2 |
LD2 PWR | Red | Indicates the board is powered |
User LD3 | Orange | User-programmable at PD13. |
User LD4 | Green | User-programmable at PD12. |
User LD5 | Red | User-programmable at PD14. |
User LD6 | Blue | User-programmable at PD15. |
USB LD7 | Green | Indicates when VBUS is present on CN5 and is connected to PA9 |
USB LD8 | Red | Indicates an overcurrent from VBUS of CN5 |

Turn on the green LED, we need to set PD12 to HIGH. To manipulate this pin
we need to make reads or writes to the GPIO peripheral that drives it.
From page 32 of the datasheet:
Each of the GPIO pins can be configured by software as output (push-pull or open-drain, with or without pull-up or pull-down), as input (floating, with or without pull-up or pull-down) or as peripheral alternate function. Most of the GPIO pins are shared with digital or analog alternate functions. All GPIOs are high-current-capable and have speed selection to better manage internal noise, power consumption and electromagnetic emission.
- Configure
PD12asGPIO_Output. This pin can have alternate functions, so we have to tell it what function we want to use. - Set this pin to
HIGHorLOWto turn the LED on or off.
[!TIP]
I ran into a lot of trouble getting the system to build and flash reliably. Eventually I found that embassy needs a specific combination of features to be enabled, and
probe-rsneeds to have certain options. See captain's log 2024-12-19 for details.
#![no_std]
#![no_main]

use defmt::*;
use embassy_executor::Spawner;
use embassy_stm32::gpio::{Level, Output, Speed};
use embassy_time::Timer;
use {defmt_rtt as _, panic_probe as _};

/// The entry point of the program.
///
/// This must never return. We denote this with `-> !` and make sure it happens
/// by including an unbounded loop in the function.
///
/// Print "Hello, world!" on startup then blink the green LED.
#[embassy_executor::main]
async fn main(_spawner: Spawner) {
    let p = embassy_stm32::init(Default::default());
    info!("Hello World!");

    let mut led = Output::new(p.PD12, Level::High, Speed::Low);

    loop {
        info!("high");
        led.set_high();
        Timer::after_millis(300).await;

        info!("low");
        led.set_low();
        Timer::after_millis(300).await;
    }
}
With embassy we can use cargo run to flash and run the program with logs
printed to the terminal as if we were running a native program.
❯ cargo run
   Compiling ahab_stm32f11ve v0.1.0 (E:\repos\philiplinden\ahab\crates\ahab_stm32f11ve)
    Finished `dev` profile [unoptimized + debuginfo] target(s) in 0.60s
     Running `probe-rs run --chip STM32F411VE --connect-under-reset E:\repos\philiplinden\ahab\target\thumbv7em-none-eabihf\debug\ahab_stm32f11ve`
      Erasing ✔ 100% [####################] 128.00 KiB @  53.98 KiB/s (took 2s)
  Programming ✔ 100% [####################]  72.00 KiB @  17.11 KiB/s (took 4s)
     Finished in 4.21s
0.000000 TRACE BDCR ok: 00008200
└─ embassy_stm32::rcc::bd::{impl#2}::init @ C:\Users\linde\.cargo\registry\src\index.crates.io-1949cf8c6b5b557f\embassy-stm32-0.1.0\src\fmt.rs:117
0.000000 DEBUG flash: latency=0
└─ embassy_stm32::rcc::_version::init @ C:\Users\linde\.cargo\registry\src\index.crates.io-1949cf8c6b5b557f\embassy-stm32-0.1.0\src\fmt.rs:130
0.000823 INFO  high
└─ ahab_stm32f11ve::____embassy_main_task::{async_fn#0} @ src\main.rs:24
0.301788 INFO  low
└─ ahab_stm32f11ve::____embassy_main_task::{async_fn#0} @ src\main.rs:28
0.602813 INFO  high
└─ ahab_stm32f11ve::____embassy_main_task::{async_fn#0} @ src\main.rs:24
0.903839 INFO  low
└─ ahab_stm32f11ve::____embassy_main_task::{async_fn#0} @ src\main.rs:28